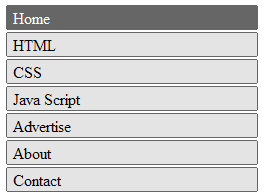
1.Login to your blogger dashboard--> layout- -> Edit HTML
2.Scroll down to where you see </head> tag .
3.Copy below code and paste it just before the </head> tag.
<style type="text/css">
.rcornersmenu a {
  width:250px;
  display:block;
  border: solid #666;
  border-width: 0 1px;
  text-decoration: none;
  outline:none;
  color: #000;
  background: #e4e4e4;
}
.rcornersmenu a b {
  display: block;
  position:relative;
  top: -1px;
  left: 0;
  border:solid #666;
  border-width:1px 0 0;
  font-weight:normal;
}
.rcornersmenu a b b {
border-width:0 0 1px;
top: 2px;
padding:1px 6px;
}
.rcornersmenu a:hover,
.rcorners a:hover b {background:#666666;color:#ffffff;}

.rcornersmenu ul,li {
list-style: none;
}
</style>
Note: You can change width,colors,... as your choice.
4.Now save your template.
5.Go to Layout-->Page Elements and click on "Add a gadget".
6.Select "html/java script" and add the code given below and click save.
<ul class="rcornersmenu">

<li><a href="#"><b><b>Home</b></b></a></li>

<li><a href="#"><b><b>HTML</b></b></a></li>

<li><a href="#"><b><b>CSS</b></b></a></li>

<li><a href="#"><b><b>Java Script</b></b></a></li>

<li><a href="#"><b><b>Advertise</b></b></a></li>

<li><a href="#"><b><b>About</b></b></a></li>

<li><a href="#"><b><b>Contact</b></b></a></li>

</ul>
You are done.
